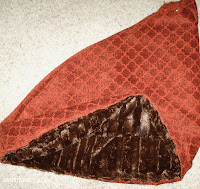
One of the most notable features of the Tudor period is the trumpet sleeve. Recognized in the pictures of Jane Grey etc, they were commonly lined with fur. Sewing with fur however is a bit intimidating. I spent hours just staring at the fabric wondering how I was going to do this part- I'm surprised how easy it ended up being... let me share.

First things first: I pinned my Red fabric and the fur together (good side in) along the outer edge of the sleeve- meaning the opening where my wrist will connect with the fabric. I sewed a single straight seam down this edge. I left the other seams open.
 Next. Opening the stitched fabric, I lined up the edges of the sleeve. The red side and the fur side look like mirror images of each other. I seamed the long curve together leaving the armseye unstitched.
Pulling the entire thing inside out, I then pulled the fur in under the red fabric. There it is, a Tudor trumpet sleeve with fur lining. Ta-Da!

Before I can go ahead and insert the sleeve and add lining, I'll need to add the ties so I can attach the inner sleeves. Pulling out the fur armseye, I folded it in half. Because my fur tends to slip a bit, I pinned it.

Using the small loop at the end of the fold, I pinned the ribbon. I stitched it well above where I plan to sew the fur to the upper sleeve lining.
Putting the whole sleeve together:

Generally speaking linings are not much to look at. In order to make the lining for the upper sleeve I used the same strategy for the outer fabric except I didn't have to worry about adding the puff and slash decoration. It turned into an ugly little thing, but it will make for a nice inner bodice.

I lined up the side seam of the fur lining with the side seam of the lining for the upper sleeve. With right sides together I stitched around the opening.
(You want to attach the inside components together first. I know the initial instinct is to attach the upper sleeve to the upper sleeve lining. That won't work and give you the beautifully lined inside that makes your garment look well made.)
 Next I attached the upper sleeve, with the puff and slash, to the matching fabric of the trumpet sleeve. Once again I lined up right sides together using the side seam.
The result of all my sewing is one very long looking sleeve.

To see what the sleeve really looks like: I reached in through the puffed and slashed sleeve until I found the upper sleeve lining. Pulling the lining up through the center of my sleeve, I dragged the fur lining with it. By matching up the side seams of my outer fabric and lining, I got my first view of my full Tudor sleeve.
Attaching the Sleeve to the Bodice:
Now that my sleeve is finished, inserting it into my bodice feels a little tricky, but it's really not.
First: I used the bodice lining facing toward me as I inserted the sleeve.
(NOTE do not attach the lining at this time. You can let it slip outside of the outer fabric if you like.)

Laying the bodice on top of my sleeve, I pinned the sleeve in place. I didn't match up bodice side seams because my puckering and slashing is based off of the inside seam of my sleeve being in the side center placement. Thus, I found the natural side of my bodice and pinned the side seam of the sleeve to that.
I will say that this is possibly the hardest moment I ever have doing a bodice. Because of the boning in the bodice, the sleeve is reluctant to turn on the sewing machine. The best thing to remember is that if you have the foot down and the needle in the fabric, the fabric is pretty well grounded. You can stop and orientate your bodice and the lengthy sleeve, so you can continue with your seam.

Last bit of business has to do with the lining. Again, I lined up my lining using the side seams. Because of the gathering I had to maneuver the material a bit. Next I folded the fabric under about an eighth of an inch and pinned it in place.
(Note: Now turn your sleeve over and push your hand up the length of the sleeve until you find the pins with your fingers. If your hand gets stuck you have twisted the fabric. Unpin and reset the material. )

Taking a sewing needle, I whip stitched with the tiniest stitches possible around the armseye. I made sure to grab all of the gathered material, so I didn't get holes later on after wearing my dress.
 YAY!!!! for the most part the Bodice is finished. I still need to make the inner-sleeves, but since they aren't attached I'm not counting them as part of the bodice.
Need to do:
Hooks and eyes down the center back
Make and Attach the JewelryPartlet/Ruff (Could be considered separate from the bodice- depends on if I do the latice.)

