I do realize that in my last blog I promised a stimulating entry on Hemming. To be honest, hemming at the most is boring... at the least it is down right dull. I do know that there are people in the universe who don't know how to hem. I promise in the near future I will provide the how to... my way at least. :) For now... let's talk hats.
Upon researching on the Internet- a decent Renaissance Hat usually goes for $100.00 to near $500.00 depending on the materials. I have also found exquisite hats in the $1000.00s though I would never spend that kind of money on a hat. I have, however, purchased one for around $200.00, looked at it, and said I can make this. I'm not sure how the hat maker feels about that, but I did make quite a few changes to the style...including shrinking it down.
Because of the Utah Shakespearean Festival and the efforts of Sandra "Stig" Stiglinski, I have the basics of a millinery background. For laymen, Millinery is the art of hat making. I am in no means professional at this art- and it truly is an art. My stylings are passable at best. However, if you do not have hundreds of dollars to spend and you want a Tall Hat, perhaps this next bit of blog can help.
First questions:
QUESTION 1: Do I really need a hat?
SCA answer: Absolutely- and it better be period and no foreign materials.
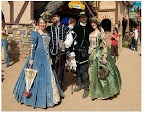
 My answer: Yes- you should have a hat, if you want to be period. If you don't- I suppose you don't need one. In the 16th Century hats were key. Everyone wore one from the lowest servant to the highest noble. Contrary to popular belief, no a circle of jewelry does not really count as a hat, nor does a circle of flowers. However, if you want to wear a circle of jewelry/flowers they're not going to keep you out of the faire. :)
For me, I like wearing a hat. I prefer the tall hats to the flat hats, mostly because I prefer making hats from buckram.
QUESTION 2: What is a tall hat and what is buckram?
 Answer A. A tall hat was a hat worn mostly by men in the 16th Century. Pictures of women wearing Tall Hats do exist mind you they are just lesser than men. It is the precursor to what we call a Top Hat in the 21st Century. There were a variety of styles of tall hats. The German style tends to billow in the sides giving it a barrel quality. I've heard many call the English variety of tall hat an upside down flower pot with a brim. And, the Italian variety looks a bit squashed. The I prefer the tall hats with the sloping crown and the curving brim. By adding ostrich plume out the side and wearing it at a precarious angle on your head, it gives a startling look.
Answer B: Buckram is a stiffened fabric used for making hats. I will warn you that you need a very stiff buckram in order to get the crown of a hat to stand and not buckle. Heavy buckram actually looks like cross stitch fabric and is difficult to bend.
Getting Started: THE HAT BLOCK
To be honest, you can make a hat without a hat block. I have done it several times, but it is so much easier to do 90% of the work if you have something sturdy in the crown.
Making a Hat block is relatively easy. First you have to decide how you want the crown of your hat to look. Do you want it thick or thin? Do you want it to slope?
 I want my hat to taper and I want it to tilt back on the brim. Because this is what I am looking for, I am going to buy a Styrofoam cone from the craft store. If you are after a thicker crown or the flower pot or barrel style, it might work to buy a plastic flower container from a nursery and clean it out. If it gives you the right slope to your crown and matches what you want, it will save you time and effort.
Taking the Styrofoam cone, I cut off the tip so the hat will be flat on top and not tilt. The base of the cone I cut at an angle to make the crown tip backward slightly. NOTE: You do not want too much of a tilt. It should be gradual.

Next, I shaved a few pieces off of the tip of the cone and added it to the back of my hat block. This makes the hat tilt back in the front but go straight up and down at the rear.

Third step, I pulled out my trusty packing tape and proceeded to wrap the Styrofoam until it felt tight and secure. I taped the sides, top, and bottom. Mostly so flakes of Styrofoam don't flake off all about my house, but also it will give some resistance to pins as I use this hat form.
Patterning the Hat:

Once I am happy with the look of my crown, I need to make a pattern. I used a light buckram for this part, however a good piece of butcher paper will work as well. Just make sure it is pliable.

Wrapping the pattern material around the hat block, I pinned the buckram in place. Once I have the entire crown covered, I cut off the excess buckram and unpinned my pattern.


Placing the hat form on a second section of buckram, I designed my brim. I drew both a rounded front and a pointed front, since I'm not sure what I want at this time. Pointed brims were more popular in the Victorian Era and it tends to cause problems when making the hat, so most likely I will end up with a rounded brim in the front.

Using the base of my hat form, I traced the opening for my hat. Upending my hat block makes it possible to make a pattern of the top of the hat as well.
The Buckram Base:

Patterns finished, I now move on to my buckram. I did have a problem with this-- I couldn't find any heavy buckram in all of St. George. Normally this would be a problem; however I discovered a few years back that you can use heavy needlepoint material doubled to get the same stiffness.

Doubling the needlepoint material, I cut out my patterns leaving room for seams. I left the pattern on the material and proceeded to cut my notches. Before I removed the pattern I folded back all the notches, so it would be easy to see where my seams need to go.

Next step: Pellon. Pellon is a very thin cotton batting that is fusible like interfacing. Some hat makers skip this step, but I find that Pellon is very good at giving a smooth sleek feel to your hat where you don't see seams. I cut the Pellon to match the pattern. (Leave no seam allowance)

Because I used a double thickness of needlepoint fabric, I need to stitch the two pieces together. Once finished, I ironed the Pellon onto the hat pieces and set the patterns aside.

For the next hour I stitched the hat together.
Start with the crown. overlapping the seam allowance, I used a simple stitch to seam the back.

I added the top of the crown, by taking only one of the notched tabs and sewing it inside the crown. As I finished one tab, I folded the second one down into the top of the crown. Because I used a hat form, it matched up perfectly.

Setting the crown down, I pushed the brim down on top of it. The tabs on the crown automatically fanned out and matched the brim. (It's important that you know where the front and back of your brim is supposed to be. You don't want to stitch and find out that you have the brim off center or even worse sideways. )

The easiest way to stitch on the brim is to turn the hat upside down and stitch through the corner of the brim and the crown. I made sure to catch the crown and the brim with each stitch. I finished by stitching the tabs down with a quick basting stitch along the brim.

Next, I needed to add wire to the brim. This will allow me to shape the hat's brim once it's covered and it will keep it's form. I chose to use a heavy aluminum wire, rather than craft wire. I have found in the past that craft wire does not have the strength I need to get the right curve.

Once I stitch the wire all the way around the brim, I can shape my hat and determine if I like the brim. (For the record, I did not like the point, unstiched the wire, and rounded the brim- It took maybe 15 minutes to make the change)
Fabric Time:
Because of the Utah Shakespearean Festival and the efforts of Sandra "Stig" Stiglinski, I have the basics of a millinery background. For laymen, Millinery is the art of hat making. I am in no means professional at this art- and it truly is an art. My stylings are passable at best. However, if you do not have hundreds of dollars to spend and you want a Tall Hat, perhaps this next bit of blog can help.
First questions:
QUESTION 1: Do I really need a hat?
SCA answer: Absolutely- and it better be period and no foreign materials.
 My answer: Yes- you should have a hat, if you want to be period. If you don't- I suppose you don't need one. In the 16th Century hats were key. Everyone wore one from the lowest servant to the highest noble. Contrary to popular belief, no a circle of jewelry does not really count as a hat, nor does a circle of flowers. However, if you want to wear a circle of jewelry/flowers they're not going to keep you out of the faire. :)
For me, I like wearing a hat. I prefer the tall hats to the flat hats, mostly because I prefer making hats from buckram.
QUESTION 2: What is a tall hat and what is buckram?
 Answer A. A tall hat was a hat worn mostly by men in the 16th Century. Pictures of women wearing Tall Hats do exist mind you they are just lesser than men. It is the precursor to what we call a Top Hat in the 21st Century. There were a variety of styles of tall hats. The German style tends to billow in the sides giving it a barrel quality. I've heard many call the English variety of tall hat an upside down flower pot with a brim. And, the Italian variety looks a bit squashed. The I prefer the tall hats with the sloping crown and the curving brim. By adding ostrich plume out the side and wearing it at a precarious angle on your head, it gives a startling look.
Answer B: Buckram is a stiffened fabric used for making hats. I will warn you that you need a very stiff buckram in order to get the crown of a hat to stand and not buckle. Heavy buckram actually looks like cross stitch fabric and is difficult to bend.
Getting Started: THE HAT BLOCK
To be honest, you can make a hat without a hat block. I have done it several times, but it is so much easier to do 90% of the work if you have something sturdy in the crown.
Making a Hat block is relatively easy. First you have to decide how you want the crown of your hat to look. Do you want it thick or thin? Do you want it to slope?
 I want my hat to taper and I want it to tilt back on the brim. Because this is what I am looking for, I am going to buy a Styrofoam cone from the craft store. If you are after a thicker crown or the flower pot or barrel style, it might work to buy a plastic flower container from a nursery and clean it out. If it gives you the right slope to your crown and matches what you want, it will save you time and effort.
Taking the Styrofoam cone, I cut off the tip so the hat will be flat on top and not tilt. The base of the cone I cut at an angle to make the crown tip backward slightly. NOTE: You do not want too much of a tilt. It should be gradual.

Next, I shaved a few pieces off of the tip of the cone and added it to the back of my hat block. This makes the hat tilt back in the front but go straight up and down at the rear.

Third step, I pulled out my trusty packing tape and proceeded to wrap the Styrofoam until it felt tight and secure. I taped the sides, top, and bottom. Mostly so flakes of Styrofoam don't flake off all about my house, but also it will give some resistance to pins as I use this hat form.
Patterning the Hat:

Once I am happy with the look of my crown, I need to make a pattern. I used a light buckram for this part, however a good piece of butcher paper will work as well. Just make sure it is pliable.

Wrapping the pattern material around the hat block, I pinned the buckram in place. Once I have the entire crown covered, I cut off the excess buckram and unpinned my pattern.


Placing the hat form on a second section of buckram, I designed my brim. I drew both a rounded front and a pointed front, since I'm not sure what I want at this time. Pointed brims were more popular in the Victorian Era and it tends to cause problems when making the hat, so most likely I will end up with a rounded brim in the front.

Using the base of my hat form, I traced the opening for my hat. Upending my hat block makes it possible to make a pattern of the top of the hat as well.
The Buckram Base:

Patterns finished, I now move on to my buckram. I did have a problem with this-- I couldn't find any heavy buckram in all of St. George. Normally this would be a problem; however I discovered a few years back that you can use heavy needlepoint material doubled to get the same stiffness.

Doubling the needlepoint material, I cut out my patterns leaving room for seams. I left the pattern on the material and proceeded to cut my notches. Before I removed the pattern I folded back all the notches, so it would be easy to see where my seams need to go.

Next step: Pellon. Pellon is a very thin cotton batting that is fusible like interfacing. Some hat makers skip this step, but I find that Pellon is very good at giving a smooth sleek feel to your hat where you don't see seams. I cut the Pellon to match the pattern. (Leave no seam allowance)

Because I used a double thickness of needlepoint fabric, I need to stitch the two pieces together. Once finished, I ironed the Pellon onto the hat pieces and set the patterns aside.

For the next hour I stitched the hat together.
Start with the crown. overlapping the seam allowance, I used a simple stitch to seam the back.

I added the top of the crown, by taking only one of the notched tabs and sewing it inside the crown. As I finished one tab, I folded the second one down into the top of the crown. Because I used a hat form, it matched up perfectly.

Setting the crown down, I pushed the brim down on top of it. The tabs on the crown automatically fanned out and matched the brim. (It's important that you know where the front and back of your brim is supposed to be. You don't want to stitch and find out that you have the brim off center or even worse sideways. )

The easiest way to stitch on the brim is to turn the hat upside down and stitch through the corner of the brim and the crown. I made sure to catch the crown and the brim with each stitch. I finished by stitching the tabs down with a quick basting stitch along the brim.

Next, I needed to add wire to the brim. This will allow me to shape the hat's brim once it's covered and it will keep it's form. I chose to use a heavy aluminum wire, rather than craft wire. I have found in the past that craft wire does not have the strength I need to get the right curve.

Once I stitch the wire all the way around the brim, I can shape my hat and determine if I like the brim. (For the record, I did not like the point, unstiched the wire, and rounded the brim- It took maybe 15 minutes to make the change)
Fabric Time:
 Once again, back to the pattern. Again I left room for the seam allowance; however, this time I did not prematurely notch the fabric. I find it too dangerous. that is how you end up with holes in your fabric. I cut two of my brim in my main fabric. I cut one of my crown in my main fabric and also one in my red lining. The top of my crown, I cut a bit larger in my main fabric than necessary as to give it a bit more play on the crown of the hat. I also cut one of the top of my crown in my lining fabric.
First step, sewing up the crown. With right sides together, I sewed a single seam down the center back of my hat. Next, I pinned right sides together of the crown top and the sides. Once sewn, I notched and pressed the seam open.

Again with right sides together, I attached the brim the same way that I attached the top of the crown-- notch, and press open.
Repeat the process with the underside of the brim and the lining.
(When sewing the lining things can get confusing, especially when you are dealing with the lining. Easiest way to do it: simply put the lining into the hat, place the fabric on the brim and fold the brim back and pin the lining. It is right sides together again, but it does play with your mind to do it.)
Getting out the Glue:
 This is part of the reason I like Pellon. Taking tacky glue I put a dob on the top of the hat, and I also smeared it on the bottom of the crown where it attaches to the brim. I don't like putting it on the entire crown, because sometimes the glue can make the fabric wrinkle.
(NOTE: Do not do this if you are using a light fabric to cover your hat. The glue will show through and ruin the effect. If you are using a light fabric, you will have to stitch the fabric in place on your buckram form.)

Before putting the fabric onto the buckram, I put the hat block inside my hat form. As I put the fabric onto the prepared buckram, I pinned the fabric in place as I pulled it tight.
Once the crown was covered, I worked on the top brim. Again I pulled it smooth and pinned the fabric in place. Once completely covered and stretched, I left it for three hours to dry.

When I returned, I removed the pins and the hatblock and repeated the process with the brims underside. I started by simply pinning the lining in place. I don't bother gluing the lining inside. It will remain once I have the rest of the hat completed. Once I had the lining pinned, I put the Hat Block once again into the crown and pinned it in place. This would ensure that my lining would not slip out while I was setting the brim fabric. Again, I left the brim to dry for about three hours.
Needle and Thread:

The next step and possibly the most tedious, I needed to stitch the top brim and lower brim together. I did this by folding under the fabric and using tiny stitches to go all the way around the brim. If the fabric was too bulky to fold under, I trimmed it.
BEWARE TRIMMING TOO MUCH! You don't want to have a fraction of a centimeter to work with! Fabric does fray and it could ruin the look of your hat.

Voila!
I still most likely will add trim to my hat, but I don't have anything I like on hand to add right now. It does need a hat band and I need to add my feathered hat pin, but for now I have a hat!
TIP: Do not throw away your hat block! I keep my hat blocks for each hat to keep the shape of the hat when I travel. By sliding in the Styrofoam into the crown of the hat, you do not have to worry about the hat being squished on a plane or in the car.
Still to do:
Finish hemming the skirt and underskirt
Beading the underskirt (If I decide to go that way)
Adjust lacings on my bodice
Partlet
Hooks and eyes for skirt and Bodice

What a wonderful tutorial. I really do love that hat:)
ReplyDeleteWhy thank you.
ReplyDelete