Working with the Tube:

(Above) Tudor gown-- Notice the front panel is wide going from sleeve to sleeve.
(Below) Not a Tudor Gown-- Here the front panel is narrow. It is still Elizabethan, but it is not Tudor. (By the way the colors are WAY off of Elizabethan colors. There was no hot pink and no electric orange in the Renaissance.

Tudor Gowns can be Embellished to narrow the waist, but notice the front panel still goes from arm seam to arm seam.

This wide front can be narrowed with adornments, beading, ribbons, etc. But what if you want to have two colors of fabrics? For example: My cousin's dress is mostly blue, but I wanted a splash of the maroon fabric from her underskirt in the bodice. Can it be done? Do you have to resort to using Simplicity Pattern 8881 and step away from authentic Tudor--Like the one above? The Answer-- No, you can adapt your pattern.
The technique is a little tricky, but if you're following my posts, then you're up for thinking outside the box.
For this Tutorial, we will be using my Mock created in the last post for my cousin's new dress.
Fold in the sides of the fabric equally to make the desired center piece for your Tudor gown. Pin it in place.

Turn over the pattern so you can see the other side of your center front, below what you have pinned.

Flip over the fabric and pin it in place to match your original line.
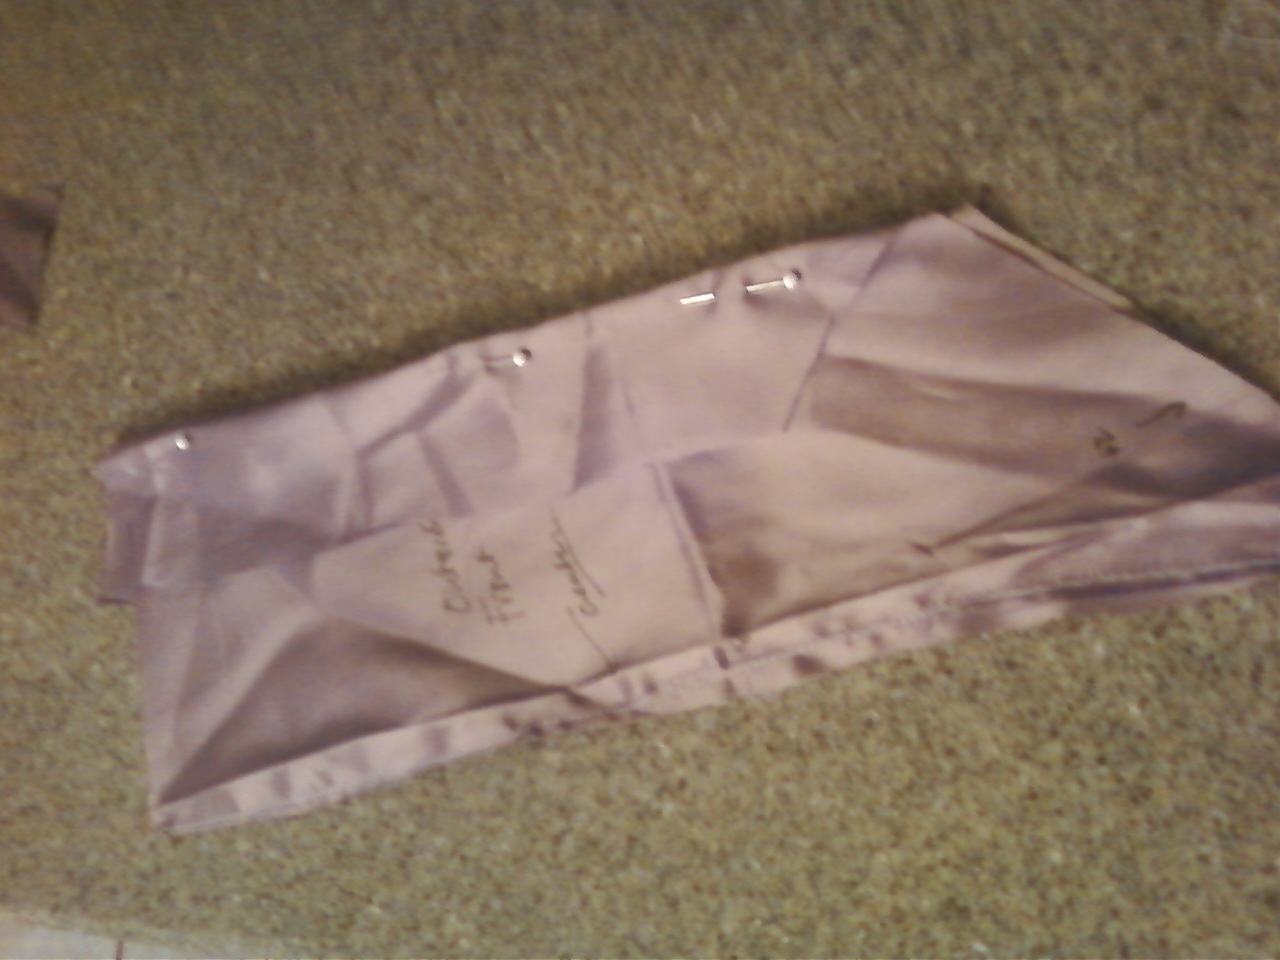
Open the fabric and look at the middle section. Is it what you want? If not, start over. If you like it, continue on.

Here is the underside of what I created. Note: when you cut out your center front, really all you are going to use is half of this pattern. I like to make sure the entire pattern is the same on both sides, just in case I need to lay the pattern flat.

Lay the pattern down on the fold like of the fabric you wish to be your center pattern and pin it into place.

Cut it out, making sure to leave a seam allowance along the side. Notice, I added the two inches required by my pattern notes to the bottom of the bodice.

Always read your pattern notes.

Next: Design the Side pieces:
Slid a piece of paper under the folded section of your Mock. Pin it into place. Taking a pen, outline the shape of the angle and line of the bodice.

Because the bodice is longer than a standard sheet of paper, you will need to make an additional piece.

Cut the paper down the middle and slide it so the point of the angle touches the fabric where it will connect to the fabric. (See the picture below)

Take the second half of paper and slid it on top of the piece you just moved.

Using your pen trace the top portion of the folded material including the top of the bodice.

Unpin the paper, making sure to keep the two halves pinned together. I usually take a piece of tape and tape them together to make sure that they stay the right length.

If you have done this section correctly, when you lay the paper piece next to the bodice, you should have the correct bodice front that matches with the original pattern.

Lay the paper pattern on the material and cut it out. Make sure you leave a seam allowance on both sides of the piece. You won't need to add the extra inches to this pattern piece, because you already cut it to match the pre-cutout front piece.

Because I am using stripes it was important to make sure that the stripes matched on both sides. To make sure that happened, I laid the fabric down putting the stripes together so the pattern would automatically fit. I also intentionally placed the pattern so the seams were over the larger stripes. That way if I miss manage my seams, the bodice will still have continuity.

At last, I check my front bodice with the two side pieces. I overlapped the seam allowances and then placed the pattern on top to make sure the measurements are correct. Everything worked out just fine. Proper Tudor front piece with a slimming effect.

Last, I cut out my lining. This is a little more tricky but not by much.
Place the cut fabric and the pattern together so the center front point lines up. Place them on the folded lining. Cut the bottom of the lining to match the pattern to the full width of the front of the bodice. Follow the line up and cut straight across the top where the cut fabric is... This will result in your lining matching the full width and length of the finished bodice. It is best to keep your lining with as few seams as possible since seams make putting stays in a real effort.


Hi Katherine- I am a theatrical costume designer and have enjoyed reading your blog -I designed and made the bright orange silk gown pictured in this post. I am happy for you to use my photograph however I would like to mention that this gown was commissioned to be worn at a Masquerade Ball and the client required a very bright (not authentic)colour. It is a Masquerade Gown inspired by the 16th century and is not a reproduction gown and was never meant to be one. I also design costumes based on Tudor/Elizabethan portraits and they are the correct period colours.
ReplyDeleteHello Jules,
DeleteI am so sorry for not getting back to you promptly. I've been camping--no tech in the mountains. Beautiful work on the dress by the way. That is exactly why I chose it. Your seaming is so exquisite it was easy to show exactly how a Tudor bodice differs from the "Disney" style bodices that a lot of people think are Elizabethan when they are not. As for the mention of colors--I figure anyone who really comes to my blog for information, might not know that electric orange and shocking pink were invented in the 1980s as a standard pallet color. Based on the sewing I could tell you knew what you were doing when you created the gown, thus the note that the colors weren't accurate--I wanted to make sure that a novice looking at your gown and saying "ooh I want that one" didn't find themselves reprimanded at one of the more notorious fairs. I really do love your work!
Katie
Edit:
Deletepeople think are "Tudor" when they are not. (Sigh) It's late.